Follow these steps to use the printers.

Web print

The uoPrint portal is secure and allows you to check your card balance, view the printing rates, and see the location of the available printers on campus.

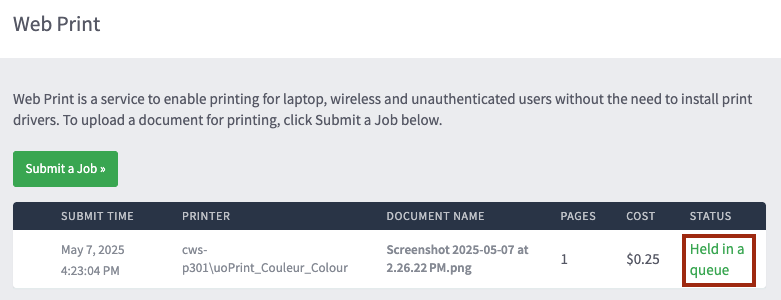
If you need to print a file previously uploaded and sent to print from your account, you can check the list of previously printed files.

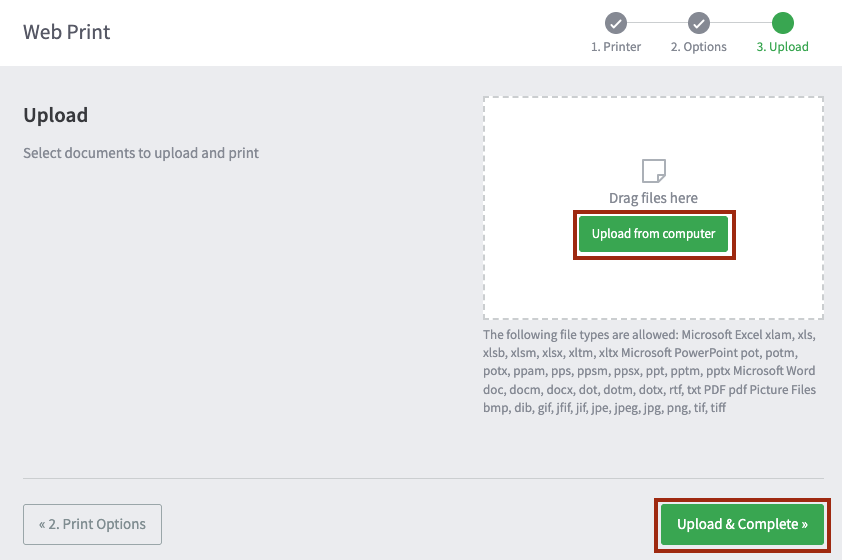
When using the portal, you can uoPrint these types of files: .pdf, .doc, .docx, .xls, .xlsx, .ptp, .ptpx, .xml. Most common image formats are also accepted, such as .jpg, .gif, .png, .tiff, and .bmp.

Please Note: You can only upload files that are 100 MB or less.

The cost of one print job cannot be $30 or more. If it's the case, the system will cancel your submission.
 

Follow these steps to submit a document for print: 

  • Send your documents for print from your device.
  • Log in with your uoAccess credentials (username without @uottawa.ca and password).
  • From the left-side navigation menu, select Web Print.
  • Click Submit a Job.
Webprint interface screenshot

Select a printer: cws-p301\uoImprimer - etu|stu - uoPrint

Printer selection screenshot
  • Select the number of copies you require by selecting Print Options and Account Selections.
  • Click Upload Documents. You can drag & drop files, or select Upload from Computer.
number of copies selection
  • To send the documents for print, select Upload & Complete.
     
Document uploading window screenshot
  • Once the upload is successful, the status displayed will show Held in queue.
     
Printing job queue screenshot

Print from a personal device (Windows/MacOS)

You can use your personal device to print to uoImprimer | uoPrint printers on campus.

You need to be connected to the campus network (Eduroam, Ethernet, VPN) to be able to install and print.

Step 1

Download the installer for:

or

Download and launch the installer found on liquidfiles in the Shares section:

  • During the installation process, select uoImprimer - etu|stu - uoPrint and click next
  • Enter your uoAccess account (without the @uottawa.ca) and your password
    • MacOS might ask you to enter your credentials the first time you print instead of during the install process.
Mobile print installation process screenshot

MacOS credentials request

  • Enter your uoAccess account (without the @uottawa.ca) in the name field and your password
Mac Os password request screenshot

Set up printing on your iPhone or iPad

Step 1

or

Step 2

  • Install the profile
  • Open iOS Settings
  • Then either:
    • Tap Profile Downloaded > Install
    • Tap General > VPN & Device Management> PaperCut Mobility Print for iOS > Install
mobility print screenshot

Step 3

  • open an app on your iOS device
  • go to the share button and select Print
  • select the uoImprimer - etu|stu - uoPrint queue that applies to you
  • Enter your uoAccess account (without the @uottawa.ca) and your password
iOS printer installation

Set up printing on your Android device

Step 1

  • From your Android device, connect to Eduroam, then download the profile Papercut Mobility Print profile.
  • Click in Install or update.
Android installation screen for mobility printer

Step 2 

  • Install the Papercut Mobility Print app from the Google Store
Google store mobility page screenshot

Step 3

  • Once the app is installed on your device, return to the first website: Papercut Mobility Print.
  • You will need to install the Mobility profile in the mobile app by clicking the Install or update button again
  • The Papercut Mobility Print app will open, and you will see the print queues.
Printer's queue screenshot

Step 4

  • Open the document you want to print. Use the print option for that document.
  • Select the print queue that applies to you: uoImprimer - etu|stu - uoPrint
  • You will receive a notification asking for your credentials.
  • Enter your uoAccess account (without @uottawa.ca) and your password.
Credentials screen